


-
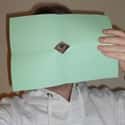
(#8) Find Your Dominant Eye
What You Need:
-A4 Card
-ScissorsWhat You Do:
The Science:
Fold the card in half lengthways, then again width-ways. Snip the corner and unfold – you should now have a small hole in the center of the card. Hold the card out at arm's length. Look through the hole while focussing on something in the middle or far distance – a tree or lamp-post will do. Slowly bring the card towards the tip of your nose – make sure you are looking at your focus object with both eyes open. As you bring the card to your nose, a friend will be able to tell you which eye is dominant, even though you think you are looking through the hole with both eyes.
Just as we all have a dominant hand or foot, we also have a dominant eye. You feel like you are using both eyes, even though one eye is doing most of the work – it is an illusion created by our brain. -
(#11) Make Your Own Slime
What You Need:
-A mixing bowl
-Food coloring
-Cornflour (3/4 cup)
-Water (1 cup)What You Do:
The Science:
Add a few drops of the food coloring to the water and pour the cornflour into the bowl. Add the water to the cornflour a little at a time. Keep stirring and adding cornflour until all of the powder is wet. Keep adding small amounts of water until you create a thick paste. You know you are ready because the harder you stir, the harder the cornflour resists. Just don't pour it down the drain – throw in the trash when finished, as it will solidify as it dries.
This particular mixture is antithixotropic – this means that any stress or shear applied to the liquid results in an increase in viscosity, or even solidification. When a force is applied, the particles in the slime line up and pack tightly together just as in a solid; with no force, the chains of cornflour can roll past one another like in a liquid. -
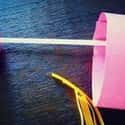
(#12) Build Your Own Hoop Glider
What You Need:
-A straw
-A card
-Scotch tape
-ScissorsWhat You Do:
The Science:
Cut two strips of card, one twice the length of the other, both around an inch thick. Make these strips into two loops – one should be much larger than the other – using the scotch tape. Stick the small loop onto end of your straw and the large loop to the opposite end. Your hoop glider is ready!
The two sizes of hoops help to keep the straw balanced as it flies. The big hoop creates "drag" (or air resistance), which helps keep the straw level, while the smaller hoop at the front keeps your super hooper from turning off course. Some have asked why the plane does not turn over since the hoops are heavier than the straw. Since objects of different weight generally fall at the same speed, the hoop will keep its "upright" position. -
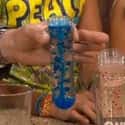
(#9) Tornado In A Bottle
What You Need:
-Plastic bottles (both the same size)
-Water
-Food coloring
-Styrofoam balls (optional)
-Duct tape
-Small washerWhat You Do:
The Science:
Fill one of the bottles with water and add some food coloring and small styrofoam balls to simulate debris. Put the small washer on the top of the filled bottle. It should rest nicely on the very top without falling in. Carefully place the second bottle upside-down on top. Use the duct tape to stick the two bottles together – make sure this connection is air-tight. (Take your time with this section – you want the tops of the two bottles to be flush against each other) Turn your bottles over and tightly swirl the top bottle (while supporting the middle) to start a vortex.
Swirling the water in the bottle while pouring it out causes the formation of a vortex. The vortex looks like a tornado in the bottle. The formation of the vortex makes it easier for air to come into the bottle and allows the water to pour out faster. If you look carefully, you will be able to see the hole in the middle of the vortex that allows the air to come up inside the bottle. If you do not swirl the water and just allow it to flow out on its own, then the air and water have to essentially take turns passing through the mouth of the bottle, thus the glugging sound. -
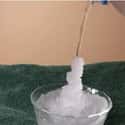
(#1) Hypercooling
What You Need:
-A metal bucket
-32 oz. of table salt
-6 16oz bottled water
-2 bags of crushed ice and water
-Thermometer (optional)
-PatienceWhat You Do:
-Take three to six (sealed) plastic bottles of mineral water.-Place them in your bucket and pour in a bag of ice; add water so that the ice becomes slushy.
-The lids of your water bottles should be sticking out the top of the ice/water mixture so you can handle them without freezing your fingers. Make sure they are evenly spaced in the bucket.
-Pour in the salt, use 26 oz of salt if you only use three bottles and 32 oz for six bottles.
-If you have a thermometer, place it in the bucket.
-Wait 35-45 minutes, but keep checking on the bottles, turn them gently to insure that they cool evenly.
-When time is up, you'll see a thin layer of ice on the outside of your metal bucket.
-Take the bottle out and turn the bottle on its side. Swing it lightly back and then BANG it against a wall. Watch as the water slowly changes color and turns to ice.
Alternate Ending:
Take a glass bowl and place a few ice cubes inside. Gently open the lid of your super cooled bottle of water. Slowly pour it onto the ice in the bowl. The liquid water should turn to ice as soon as it makes contact with ice cubes in the bowl. This means that you should be able to produce a tower of ice as you keep pouring.The Science:
-Pouring liquid water that lands as solid ice – this works because of the ice cubes already in the bowl. One of the best nucleation sites that you can use to form ice crystals, is other ice crystals.
-When the bottles are super cooled, they are ready for a freezing catalyst. One theory is that the banging creates microscopic air bubbles near the surface in the bottles, and these bubbles act as the impurity/nucleation site. -
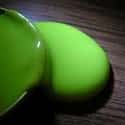
(#5) Make Your Own Lava Lamp
What You Need:
-Transparent jar with an airtight lid (jam jar or similar)
-Water
-Vegetable Oil
-Food Coloring
-Salt
-Torch
-Glitter (optional)What You Do:
Fill the jar to around the 3/4 mark with water. Then add food coloring of your choice (a drop at a time) until you have your desired color. Add glitter (if you want). Fill your jar almost to the top with oil and leave for 15 minutes to settle. Then add teaspoons of salt – you will start to see a lava-lamp effect. Shine a flashlight through the jar and the effect is complete! When the salt dissolves, the oil will return to the surface. Add more salt to see the effect again.
The Science:
il is less dense than water, and so rests on top. When you add salt, it sticks to the oil; because salt is more dense than water, it sinks - when enough salt attaches to a blob of oil, the whole blob sinks. When the salt dissolves in the water, the oil's low density causes it to rise up again.

New Random Displays Display All By Ranking
About This Tool
The coolest thing about science is that it describes some of the phenomena that are happening around us all the time. Sometimes people can easily connect science with the real world. Some simple scientific experiments can be carried out at home, and by using daily household items, they can show abstract concepts that many people may have difficulty grasping in normal daily life.
If you are looking for fun indoor activities, consider doing one of the following experiments, which amazes people. The random tool introduced 13 easy science projects that practice with household items. It must be noted that even if you are not in the laboratory, safety is very important.
Our data comes from Ranker, If you want to participate in the ranking of items displayed on this page, please click here.